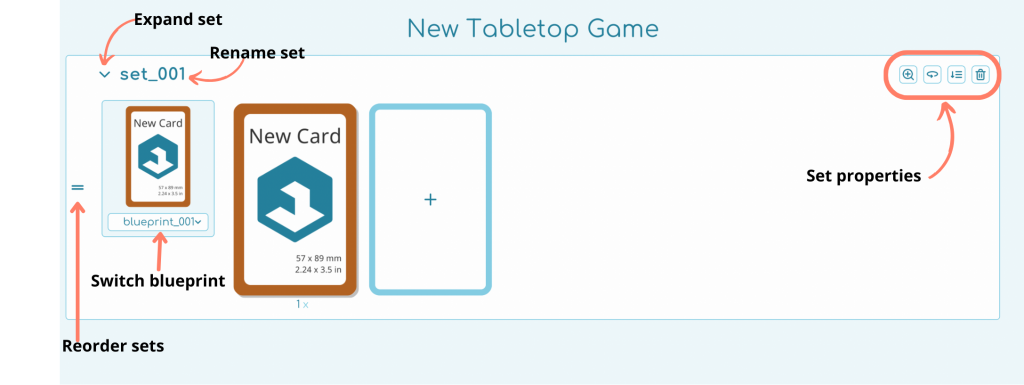
To effectively manage your sets, explore the following options:
Rename set
To rename your set, simply double-click on the set’s name. This allows you to quickly and easily customize the names of your sets, ensuring they are appropriately labeled for better organization within your project.
Expand sets
Use the dropdown arrow next to the set name to show or hide all the elements within your sets simultaneously. This feature helps you maintain a more organized and efficient workflow by allowing you to manage and prioritize the sets you’re currently working on.
Switch set blueprint
When working with multiple blueprints, click on the dropdown menu within the set’s blueprint preview to choose the blueprint that best fits your set. This enhancement streamlines the workflow, ensuring that you can quickly and efficiently create sets with the exact blueprint you need.
Note: To visualize the blueprint preview, ensure that the “show set blueprint preview” option is turned on in the settings.
Reorder sets
Use the symbol (=) on the left side of each set to drag and move the set up or down in the list. This functionality allows you to easily rearrange the order of your sets, giving you flexibility in organizing your workflow based on your current needs and priorities.
Set properties
Customize the key properties of your set to enhance your project workflow:
- Zoom: Zoom in or out to get a closer look or a broader view of the items within your set. Use the keyboard shortcuts
CMD + Scroll(on Mac) orCTRL + Scroll(on Windows) for quick zooming.
- Flip: Change the orientation of the items to view their reverse side, allowing you to edit both the front and back.
- Sort: Organize your items based on the following criteria, making it easier to navigate and manage your set:
| Options | Description |
|---|---|
| Reverse | Invert the current order of items. |
| Last modification | Organize items based on the most recent changes. |
| Creation date | Sort items by the date they were created. |
| Amount | Sort items by the quantity or numerical value. |
| Alphabetical (Identifier) | Order items alphabetically based on their identifier. |
| Identifier color | Sort items by the color of the identifier. |
| Logo – Value | Organize items by the value associated with the logo. |
| Logo – Color | Sort items based on the color of the logo. |
| Text Bottom – Value | Arrange items according to the value of the bottom text. |
| Text Bottom – Color | Sort items based on the color of the bottom text. |
| Text Top – Value | Order items according to the value of the top text. |
| Text Top – Color | Sort items based on the color of the top text. |
- Delete: Remove the set if it’s no longer needed, streamlining your project and freeing up space.

Quick Tips
ℹ️ The Refresh Item option in the context menu is meant to force-refresh the preview rendering of an item for certain special cases where it doesn’t refresh automatically. This can occur, for example, when you are using special variables like item numbers or the total item count. It’s important to note that when exporting items, they will always refresh their renders automatically. Therefore, you don’t need to use this option before exporting.


