
A Blueprint in Tabletop Creator is the foundational design for your board game, establishing the basic structure and layout. You can start with predefined templates or fully customize your blueprint’s size and design, even after its creation.
El Blueprint Manager lets you organize, edit, duplicate, or delete blueprints, as well as create blueprint sets for better organization.
Blueprints are the essential starting point, providing the structure needed to bring your game vision to life.
In this article, you will find the following sections:
- Create a new blueprint
- Blueprint manager settings
- Blueprint context menu
- Blueprint properties
- Blueprint shapes
- Zoom in-out your blueprint
Create a new blueprint
When you create a project in Tabletop Creator, a new blueprint is automatically generated along with an empty set.
There are two simple methods to create additional blueprints:
From the Components Screen
- Open the dropdown at the bottom.
- Choose to create a new deck, token, or board associated with a new blueprint for your project.
- Duplicating a set also creates a new blueprint.

From the Blueprint Manager
- Go to Menu > Blueprint > Add Blueprint.
- Create additional blueprints as needed for your project.
In both cases, when you choose the new blueprint, you’ll have a list of templates with specific sizes:
Token sizes
| Name | Size (mm) | Size (in) |
|---|---|---|
| Small Token | 12.8 x 12.8 | 0.50 x 0.50 |
| Medium Token | 19.0 x 19.0 | 0.75 x 0.75 |
| Large Token | 25.3 x 25.3 | 1.00 x 1.00 |
Card sizes
| Name | Size (mm) | Size (in) |
|---|---|---|
| Micro Card | 32.0 x 44.4 | 1.26 x 1.75 |
| Mini Card | 44.4 x 63.5 | 1.75 x 2.50 |
| Domino Card | 44.4 x 88.9 | 1.75 x 3.50 |
| Business Card | 50.8 x 88.9 | 2.00 x 3.50 |
| Mint Tin Card | 52.0 x 87.0 | 2.05 x 3.43 |
| US Game Card | 55.9 x 87.1 | 2.20 x 3.43 |
| Bridge Card | 57.0 x 88.9 | 2.24 x 3.50 |
| Euro Poker Card | 63.0 x 88.0 | 2.48 x 3.46 |
| Small Square Card | 63.5 x 63.5 | 2.50 x 2.50 |
| Poker/Trading Card | 63.5 x 88.9 | 2.50 x 3.50 |
| Euro Square Card | 70.0 x 70.0 | 2.76 x 2.76 |
| Tarot Card | 70.0 x 121.0 | 2.76 x 4.76 |
| Divider Card | 76.0 x 88.9 | 2.99 x 3.50 |
| Square Card | 88.9 x 88.9 | 3.50 x 3.50 |
| Jumbo Card | 88.9 x 140.0 | 3.50 x 5.51 |
Board sizes
| Name | Size (mm) | Size (in) |
|---|---|---|
| Small Board | 101.7 x 101.7 | 4.00 x 4.00 |
| Medium Board | 203.2 x 203.2 | 8.00 x 8.00 |
| Big Board | 254.0 x 254.0 | 10.0 x 10.0 |
Blueprint manager settings
Within the blueprint manager screen, discover the following settings:
- Flip: Invert the orientation of all blueprints, revealing their reverse sides.
- Sort Largest to Smallest: Arrange blueprints based on size, either from the largest to the smallest or in reverse order for customized organization.
- Rename Blueprint: To change the blueprint’s name for better identification and organization, double-click on the name (e.g., blueprint_001 -> MyBlueprint)
Blueprint context menu

Right-click on a Blueprint to open the context menu, where you can perform actions such as:
- Duplicate Blueprint: Creates a copy of the blueprint, useful for creating multiple versions or iterations.
- Create a New Set: Generates a new set of blueprints, which can be used to organize related designs.
- Remove Blueprint: Deletes the blueprint from your project; use with caution to avoid unintended loss of work.
Blueprint properties
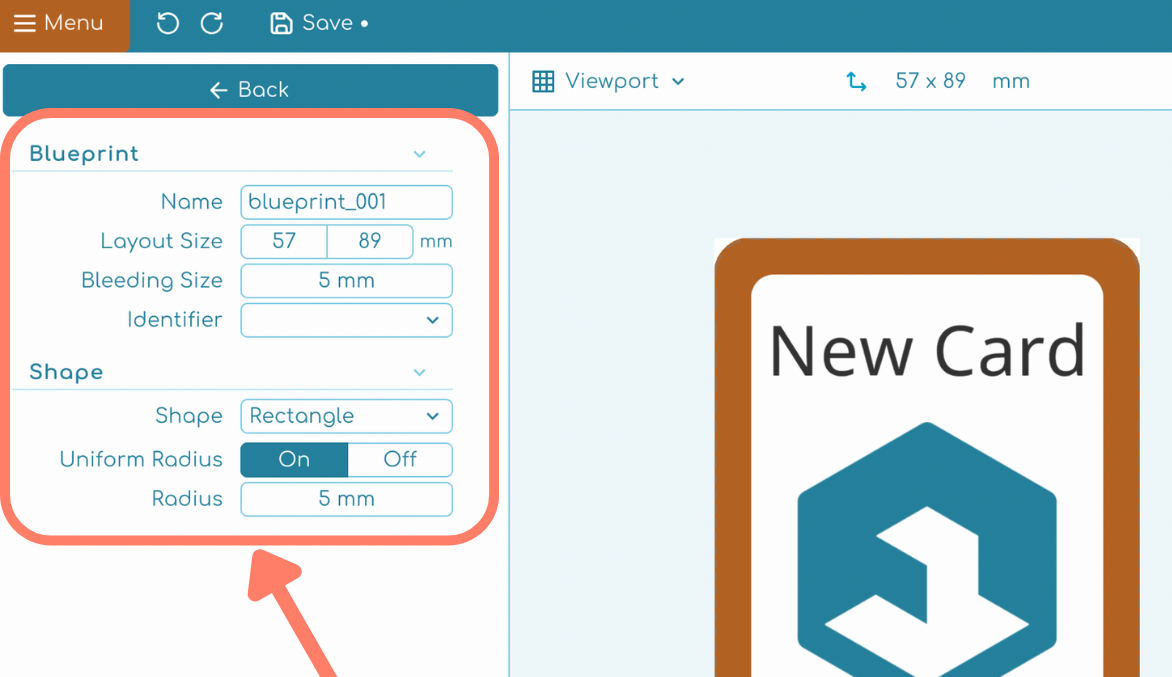
Upon opening your blueprint, you will find the Blueprint Inspector on the left, providing flexibility for adjustments such as: Name, Layout Size, Bleeding Size, Identifier, and Shapes.
To see these properties, ensure no panel or layer is selected. If any are selected, click on the blueprint’s background to deselect and reveal the properties.
Name
Customize the name of your blueprints here to easily identify and organize them within your project.
Layout size
Customize the size of your blueprints here based on your project’s requirements.
Bleeding size
Set the bleeding size, extend panels beyond the blueprint margins, and this size will be used to visualize the bleeding & safe zone when visibility is enabled in the viewport settings.
Note: Read more about bleeding in the Bleeding & Safety Zone article.

Identifier
Within your blueprint, designate a specific panel as the main panel. The primary value of the selected main panel becomes crucial when updating items, especially during data imports from spreadsheets like Excel or CSV. This designated value is prominently displayed on the component screen above each item, if the setting “show set items identifier labels” is activated.
Quick tips
ℹ️ Each panel within the blueprint will adjust its size based on the transform constraint settings value, determining its resize behavior.
ℹ️ While the gizmo in the viewport can be used to resize, manually setting values in the inspector provides a more precise control over the adjustment process. Feel free to explore both methods to find the one that best suits your workflow.
Blueprint shapes
Discover the powerful features of the Blueprint Shapes section, giving you precise control over your blueprint’s appearance. Now, customize your blueprints’ shapes to match your exact specifications.
Shape
Choose from a diverse range of shapes, including rectangles, circles/ellipses, polygons/stars, or employ a custom mask to craft any shape imaginable. Depending on your chosen shape, you’ll have access to specific customization features:
Rectangle
- Uniform Radius: Toggle this feature to maintain uniform corner radii across the shape or adjust each corner individually for more intricate designs.
- When Uniform Radius is switched ON: Customize the default radius of the shape to refine its appearance. The default value is set to 5 mm, but adjustments can be made to suit your preferences.
- When Uniform Radius is switched OFF, you can independently adjust the radius of each corner:
- Top-Left Radius: Modify the radius of the top-left corner.
- Top-Right Radius: Adjust the radius of the top-right corner.
- Bottom-Right Radius: Refine the radius of the bottom-right corner.
- Bottom-Left Radius: Fine-tune the radius of the bottom-left corner.
Circle / Ellipse
- Ellipse Width: Adjust the width of the ellipse. The default value is 100%.
- Ellipse Height: Adjust the height of the ellipse. The default value is 100%.
- Rotation: Set the rotation angle of the ellipse. The default value is 0°.
Polygon / Star
- Polygon Vertices: Define the number of vertices for the polygon. The default value is 6.
- Polygon Star Angle: Adjust the angle of the star’s points. The default value is 0%.
- Polygon Roundness: Control the roundness of the polygon’s corners. The default value is 0%.
- Rotation: Set the rotation angle of the polygon. The default value is 0°.
Custom shape
- File / URL: Utilize this field to load a custom image file or URL to define a unique shape using a mask.
- Rotation: Set the rotation angle of the custom shape. The default value is 0°.
- With these comprehensive customization options, you can effortlessly tailor the shapes within your blueprints to precisely match your project requirements.
Zoom in-out your blueprint
For detailed work, zoom in y zoom out with your mouse wheel. Navigate smoothly using scrollbars or by clicking the middle mouse button (or clicking in an empty area with the left button).